This year I’m starting a new role with Roboflow. I’ll be helping companies build and deploy computer vision applications. The team, the product, and the mission are all incredible and I’m excited to be a part of building the future of computer vision. With this in mind, I thought it’d be fun to document my journey as I learn some of the tools and techniques that we use to build computer vision applications – starting with the Supervision python package. Here is a sneak peak at some of the things we’re going to build and cover.
What is Supervision?
Visiting the Supervision documentation a purple widget reading “Ask AI” caught my eye. I decided to ask it What is the Supervision python package?.
“Supervision is an open-source Python package developed and maintained by Roboflow. It is designed to facilitate the creation of computer vision applications by providing a range of utilities. The package is distributed under an MIT license, allowing you to use it freely in your projects, whether they are public or private… "
- Ask AI Widget
The bot went on to describe what you can build with Supervision, and the various utilities available for tracking, annotation, and filtering detections. I was impressed that the project is empracing recent developments of Large Language Models (LLMs) and Retrieval Augments Generation (RAG) inside of the docs to help users quickly find the information they need to guide their project. The bot’s response serves as inspiration for some of the experiments in this post.
Where to start?
Before we start playing with the package, let’s scaffold our project and install the package. Let’s also make sure we have a video to show off some of the features and functionality.
Installation
The first step is to install the Supervision package. This can be done with the following pip command in a terminal of your choice. Personally, I like to first create a virtual environment so that my projects’ deppendencies are isolated. Let’s install the Supervision pre-release version, as it contains some new features that we’ll be using.
python3 -m venv venv && source venv/bin/activate && pip install "supervision==0.18.0rc1"
Video Asset
Now that we have the package installed, we need a video to test and demo. Luckily for us, the Supervision package has a great selection of high quality video assets that can be used for project ideas and demos. Let’s utilize the video of vehicles driving on a highway. You can install the video either with the python package or any other way you’d download a video from a link on the internet. I’ll be using wget to install the video in my current directory.
wget https://media.roboflow.com/supervision/video-examples/vehicles.mp4 --output vehicles.mp4
And voila! We’ve got the perfect video for our project. Let’s take a look.
Supervision Features
Now that we’ve got Supervision installed and a video asset for our project, let’s checkout some of the features that the package has to offer. From the documentation there’s a lot to play with, including annotators, trackers, and other tools/utilities. Let’s start with detecting vehicles in the video.
Detecting Vehicles
In order to detect vehicles we’ll need a model, preferably a model that has been trained on vehicle data. Here is where Supervision features start to shine. The package inlcudes a variety of connectors for popular models from Ultralytics, Meta, and Roboflow. So with a single line of code, we can swap out the model we’re using in our application 🤯. A full list of connectors can be found in the documentation. Since we’re detecting vehicles, let’s use the pretrained YOLOv8 model from Ultralytics. There are a few ways we can do this, but in this project we’ll use another Roboflow package called Inference. We’ll do a deep dive on Inference in the future, but for now just know that it’s an open source package that supports running object detection, classification, instance segmentation, and foundational models that also provides a ton of advanced uses and deployment options.
To install Inference run the following command in your terminal.
pip install inference
Now that we have Inference installed, let’s write a little bit of code.
import supervision as sv
from inference.models.utils import get_roboflow_model


if __name__ == '__main__':

    # load the yolov8X object detection model from roboflow inference
    model = get_roboflow_model('yolov8x-640')

    # get frames iterable from video and loop over them
    frame_generator = sv.get_video_frames_generator('vehicle.mp4')
    for frame in frame_generator:
        # run inference on the frame
        result = model.infer(frame)[0]
        # convert the detections to a supervision detections object
        detections = sv.Detections.from_inference(result)
In the above code we’re pulling in the object detection yolov8x-640 model from Roboflow Inference, but we could have easily swapped it out for any of our fine tuned models from Roboflow or Roboflow Universe 😮.
# rock, paper, scissors model from roboflow universe
model = get_roboflow_model('rock-paper-scissors-sxsw/11', api_key='roboflow_private_api_key')

# custom trained model on tricks my golden retriever Ollie can do
model = get_roboflow_model('goldeneye/8', api_key='roboflow_private_api_key')

# Yolov8 Segmentation model from Roboflow
model = get_roboflow_model('yolov8x-seg-640')
We’re also using a fancy utility from the Supervision package called get_video_frame_generator which returns a Python generator that yields frames from our video. Lastly, we’re running Inference on each frame with our model and converting the results to a Supervision Detections object.
Annotations
At the time of writing this document Supervision supports 15 different annotation types. These include BoundingBox, BoxCorner, Color, Circle, Dot, Triangle, Ellipse, Halo, Mask, Polygon, Label, Blur, Pixelate, Trace, and HeatMap.
Stacking Annotations
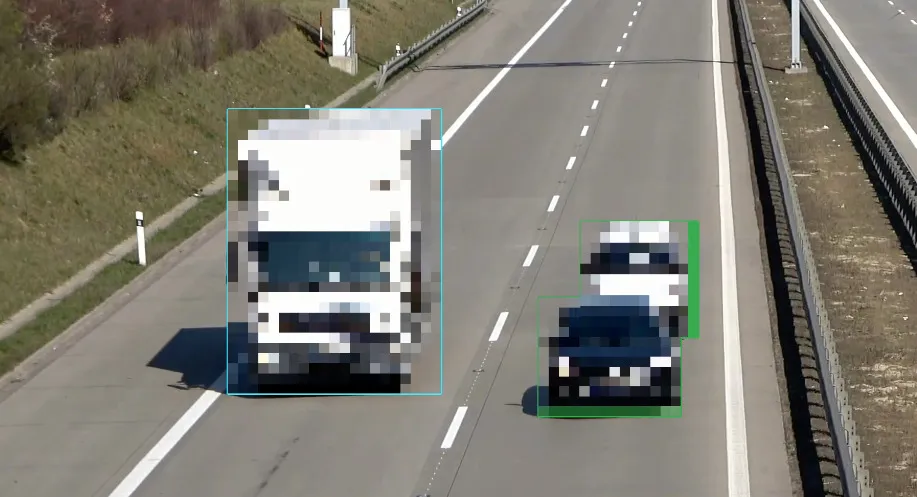
Each annoator has the ability to be stacked; however one interesting finding is that the order may influence the quality of the output. For example, if you were to annotate a bounding box, then stack a pixelated annoation, the bounding box may be pixelated as seen in the image below.
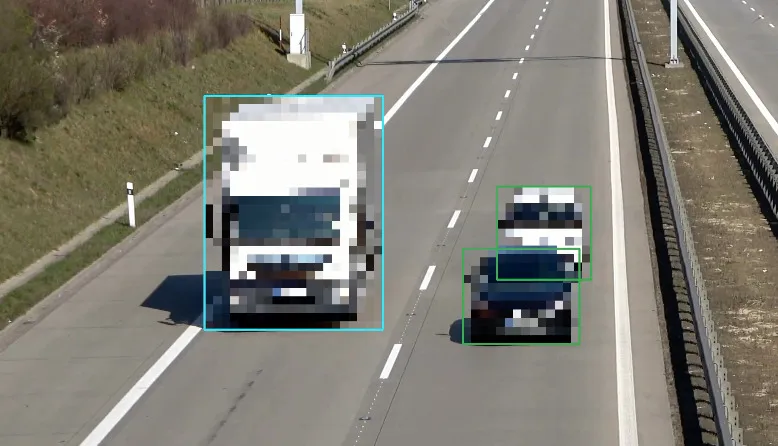
You can solve this problem by instead adding the pixelated annotation first, then the bounding box annotation.
Let’s dive into the code for creating these annotations.
import supervision as sv
from inference.models.utils import get_roboflow_model


if __name__ == '__main__':

    # load the yolov8X model from roboflow inference
    model = get_roboflow_model('yolov8x-640')

    # get video info from the video path and dynamically generate line thickness
    video_info = sv.VideoInfo.from_video_path('vehicle.mp4')
    thickness = sv.calculate_dynamic_line_thickness(video_info.resolution_wh)

    # create a bounding box annotator with dynamic thickness and a pixelate annotator
    bounding_box = sv.BoundingBoxAnnotator(thickness=thickness)
    pixalate = sv.PixelateAnnotator()

    # get frames iterable from video and loop over them
    frame_generator = sv.get_video_frames_generator('vehicle.mp4')

    # create a video sink context manager to write the annotated frames to
    with sv.VideoSink(target_path="output.mp4", video_info=video_info) as sink:
        for frame in frame_generator:

            # run inference on the frame
            result = model.infer(frame)[0]

            # convert the detections to a supervision detections object
            detections = sv.Detections.from_inference(result)

            # apply pixalate on frame copy, then add bounding box
            annotated_frame = pixalate.annotate(scene=frame.copy(), detections=detections)
            annotated_frame = bounding_box.annotate(scene=annotated_frame, detections=detections)

            # save the annotated frame to the video sink
            sink.write_frame(frame=annotated_frame)
We’ve introduced a couple of helpful utilities. The VideoInfo object helps us by providing information including frames per second, height, width, etc. We can use this information to dynamically generate annotator line thickness with the sv.calculate_dynamic_line_thickness() method. Next, we create a couple of annotators, a BoundingBoxAnnotator and a PixelateAnnotator. We’re also introducing a new concept called a VideoSink which is just a fancy context manager that allows us to write frames to a video output. Prior to this we apply the annotations to the frame with the annotate methods on the annotators. Pretty cool right?
Segmentation vs Detection Annotations
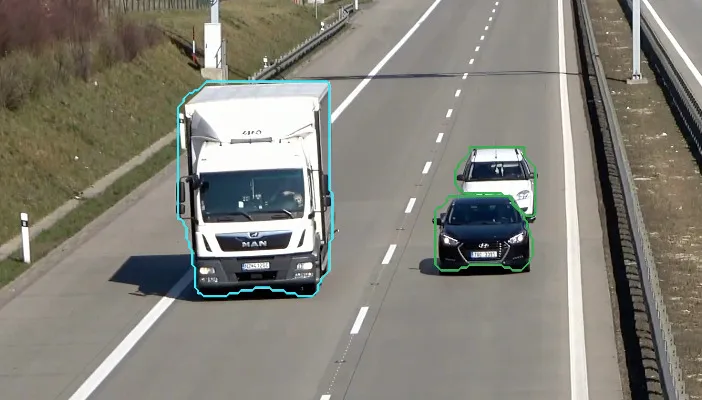
Some annotations require specific model output that depend on the data returned at inference time. More specifically, the Halo, Mask, and Polygon all use sv.Detections.mask under the hood to generate the annotations. This means that we need to use a segmentation model, instead of our object detection model to use these annoations. Let’s swap out our model yolov8x-640 for yolov8x-seg-640 to ensure we recieve a mask property in our detection ojects. Take a look at an example of the Polygon Annotator.
import supervision as sv
from inference.models.utils import get_roboflow_model


if __name__ == '__main__':

    # load a segmentation model from roboflow inference instead
    model = get_roboflow_model('yolov8x-seg-640')

    ...
Tracking and Annotations
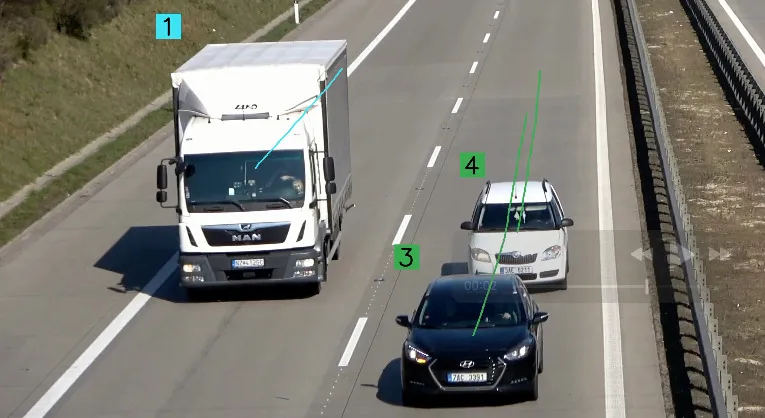
The Trace annotator requires the sv.Detections.tracker_id be present to generate annotations. This means that we’ll have to use a tracker. Trackers are a piece of code that identifies objects across frames and assigns them a unique id. For example, we could use a tracker to learn what direction a vehicle is moving. There are a few popular trackers at the time of writing this including ByteTrack and Bot-SORT. Supervision makes using trackers a breeze and comes with ByteTrack built-in.
Let’s dive into some tracking code!
import supervision as sv
from inference.models.utils import get_roboflow_model


if __name__ == '__main__':

    # load the yolov8X model from roboflow inference
    model = get_roboflow_model('yolov8x-seg-640')

    # get video info from the video path and dynamically generate line thickness and text_scale
    video_info = sv.VideoInfo.from_video_path('vehicle.mp4')
    thickness = sv.calculate_dynamic_line_thickness(video_info.resolution_wh)
    text_scale = sv.calculate_dynamic_text_scale(video_info.resolution_wh)

    # create a trace and label annotator, with dynamic video info
    trace = sv.TraceAnnotator(thickness=thickness)
    label = sv.LabelAnnotator(text_thickness=thickness, text_scale=text_scale)

    # create a ByteTrack object to track detections
    byte_tracker = sv.ByteTrack(frame_rate=video_info.fps)

    # get frames iterable from video and loop over them
    frame_generator = sv.get_video_frames_generator('vehicle.mp4')

    # create a video sink context manager to write the annotated frames to
    with sv.VideoSink(target_path="output.mp4", video_info=video_info) as sink:
        for frame in frame_generator:

            # run inference on the frame
            result = model.infer(frame)[0]

            # convert the detections to a supervision detections object
            detections = sv.Detections.from_inference(result)

            # update detections with tracker ids
            tracked_detections = byte_tracker.update_with_detections(detections)

            # apply trace annotator to frame
            annotated_frame = trace.annotate(scene=frame.copy(), detections=tracked_detections)

            # create label text for annotator
            labels = [ f"{tracker_id}" for tracker_id in tracked_detections.tracker_id ]

            # apply label annotator to frame
            annotated_frame = label.annotate(scene=annotated_frame, detections=tracked_detections, labels=labels)

            # save the annotated frame to the video sink
            sink.write_frame(frame=annotated_frame)
In this code, we add text_scale as a new dynamic value for labeling the tracker_id. Next, we add a Trace and Label Annotator with these dynamic values. We also create a ByteTrack object to track our detections passing in the video’s frame rate. From there, all we need to do is update the detections with our byte_tracker results using the method update_with_detections. Lastly, we create a list of labels from the tracker_ids and pass them to the label annotator while also utilzing the TraceAnnotator to trace the path of each detection.
GOTCHA - Stacking Trace with Segmentation Annotations
When trying to stack a Trace annotation with a Polygon annotation, I ran into a hiccup. When using a detections from ByteTrack.update_with_detections(detections) the resulting sv.Detections does not include segmentation masks 😭. This isn’t a show stopper, but there is a little bit of nuance if we’d like to stack a Segmentation Annotator with a Trace Annotator.
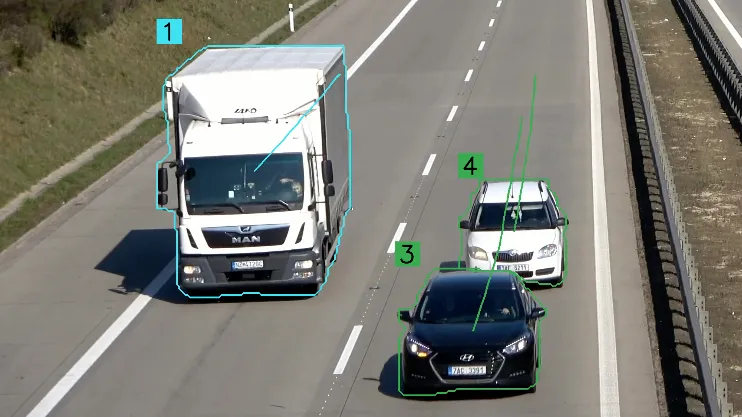
We need to apply the polygon annotation with the sv.Detections.from_inference() instead of the detections from ByteTrack.update_with_detections(detections). The former contains the mask and the latter doesn’t include the mask. This looks to be a bug, as the latter does include a mask property, it just returns None. More to come on this.
...

# convert the detections to a supervision detections object
detections = sv.Detections.from_inference(result)

# first apply annotation that requires sv.Detections.mask
annotated_frame = polygon.annotate(scene=frame.copy(), detections=detections)

# then update detections with tracker ids
tracked_detections = byte_tracker.update_with_detections(detections)

# apply trace annotator to frame
annotated_frame = trace.annotate(scene=annotated_frame, detections=tracked_detections)

...
To wrap up Annotators, let’s get a little crazy 🙈. Let’s cycle through a few more of the available annotations in a single video to check them all out. Below is the resulting video.
Annotations are a powerful tool for visualizing detections. Now let’s cover some powerful tools that Supervision provides.
Tools
Supervision provides a few additional tools that can be used to filter detections, count detections, create zones, and slice frames. Let’s dive into a few of them!
Counting with Line Zones
A Line Zone can be utilized for counting a number of objects that cross a predefined line. One cool feature of the line is that it keeps track of two attributes: in_count and out_count. These attributes can be used to count the number of objects that cross the line in either direction. Note that the LineZone utilizes the sv.Detections.tracker_id to keep track of objects so make sure you’re using a tracker as discussed above. Remember earlier when I said that supervision has 15 annotators? Well, I lied. There are a few more that are only documented in in the best kind of documenation, the code 😜. Let’s create a LineZone and show it in action with the LineZoneAnnotator.
And here’s the code.
import supervision as sv
from inference.models.utils import get_roboflow_model

if __name__ == '__main__':

    # load the yolov8X model from roboflow inference
    model = get_roboflow_model('yolov8x-640')

    # get video info from the video path and dynamically generate line thickness and text_scale
    video_info = sv.VideoInfo.from_video_path('vehicle.mp4')
    text_scale = sv.calculate_dynamic_text_scale(video_info.resolution_wh)

    # create a ByteTrack object to track detections
    byte_tracker = sv.ByteTrack(frame_rate=video_info.fps)

    # get frames iterable from video and loop over them
    frame_generator = sv.get_video_frames_generator('vehicle.mp4')

    # create two points of a line for the LineZone
    start_point = sv.Point(0, video_info.height*(3/4))
    end_point = sv.Point(video_info.width, video_info.height*(3/4))

    # create the LineZone object
    line_zone = sv.LineZone(start_point, end_point)

    # create the LineZoneAnnotator
    line_annotator = sv.LineZoneAnnotator(
        color=sv.Color.green(),
        text_scale=text_scale,
        custom_in_text="OUT",
        custom_out_text="IN",
    )

    # create a video sink context manager to write the annotated frames to
    with sv.VideoSink(target_path="output.mp4", video_info=video_info) as sink:
        for frame in frame_generator:

            # run inference on the frame
            result = model.infer(frame)[0]

            # convert the detections to a supervision detections object
            detections = sv.Detections.from_inference(result)

            # update detections with tracker ids
            tracked_detections = byte_tracker.update_with_detections(detections)

            # update the linezone object with detections
            line_zone.trigger(detections=detections)

            # apply the line zone annotator to the frame
            annotated_frame = line_annotator.annotate(frame=frame.copy(), line_counter=line_zone)

            # save the annotated frame to the video sink
            sink.write_frame(frame=annotated_frame)
When first running this code, I ran into the following issue:
Traceback (most recent call last):
  File "/Users/nick/git/computer-vision/line_zone.py", line 41, in <module>
    line_zone.trigger(detections=detections)
  File "/Users/nick/git/computer-vision/venv/lib/python3.11/site-packages/supervision/detection/line_counter.py", line 57, in trigger
    for i, (xyxy, _, confidence, class_id, tracker_id) in enumerate(detections):
           ^^^^^^^^^^^^^^^^^^^^^^^^^^^^^^^^^^^^^^^^^^^
ValueError: too many values to unpack (expected 5)
To fix this issue, I cracked open the supervision package and change the following code in line_counter.py to ignore the data field in the detections object.
for i, (xyxy, _, confidence, class_id, tracker_id, _) in enumerate(detections):
We’re using the early release candidate so expect a couple of bugs. This should be fixed in the next release. Let’s now move on to another tool, the Polygon Zone!
Filtering with Polygon Zones
The Polygon Zone is an object we can utilize for a variety of tasks. We can filter detections, count, and provide logic for a variety of other tasks. Let’s use it to filter out detections that are only on the right side of the highway. We’ll also utilize the PolygonZoneAnnotator to visualize the polygon zone and keep a count of detections inside of it.
Let’s take a peek at the code.
import supervision as sv
from inference.models.utils import get_roboflow_model
import numpy as np


if __name__ == '__main__':

    # load the yolov8X model from roboflow inference
    model = get_roboflow_model('yolov8n-640')

    # get video info from the video path and dynamically generate line thickness and text_scale
    video_info = sv.VideoInfo.from_video_path('vehicle.mp4')
    text_scale = sv.calculate_dynamic_text_scale(video_info.resolution_wh)

    # create a ByteTrack object to track detections
    byte_tracker = sv.ByteTrack(frame_rate=video_info.fps)

    # get frames iterable from video and loop over them
    frame_generator = sv.get_video_frames_generator('vehicle.mp4')

    # create a polygon for use in the PolygonZone using https://roboflow.github.io/polygonzone/
    polygon = np.array([[9, 1758],[1125, 846],[1697, 850],[1885, 2146],[17, 2146],[17, 1754]])

    # create the PolygonZone object and PolygonZoneAnnotator
    polygon_zone = sv.PolygonZone(polygon, frame_resolution_wh=video_info.resolution_wh)
    polygon_annotator = sv.PolygonZoneAnnotator(color=sv.Color.green(), zone=polygon_zone, text_scale=text_scale)

    # create a box annotator to visualize detections inside the polygon zone
    box_annotator = sv.BoxAnnotator(text_scale=text_scale)

    # create a video sink context manager to write the annotated frames to
    with sv.VideoSink(target_path="polygonzone.mp4", video_info=video_info) as sink:
        for frame in frame_generator:

            # run inference on the frame
            result = model.infer(frame)[0]

            # convert the detections to a supervision detections object
            detections = sv.Detections.from_inference(result)

            # filter based on the polygon zone
            detections = detections[polygon_zone.trigger(detections)]

            # update detections with tracker ids
            tracked_detections = byte_tracker.update_with_detections(detections)

            # update the polygon zone with detections for count
            polygon_zone.trigger(tracked_detections)

            # show the polygon zone and box annotator
            annotated_frame = polygon_annotator.annotate(scene=frame.copy())
            annotated_frame = box_annotator.annotate(scene=annotated_frame, detections=tracked_detections)

            # save the annotated frame to the video sink
            sink.write_frame(frame=annotated_frame)
Holy cow that’s pretty sweet! We’re using the PolygonZone and PolygonZoneAnnotator to both filter detections and count the vehicles in the zone. You can start to see all the possibilities of using custom models and a variety of polygon zones.
First Impressions
It’s clear that the package is moving quickly and features are changing rapidly. The documentation is currently lagging behind, so sometimes you need to dive into the code to see what’s new. As I started to play with the tool it’s easy to see how custom models and this tooling can help developers make the world programmable. It’s incredible what you can do in a few lines of code with the Supervision package. I’m excited to try out some of the other improvements to Supervision as they are released. The future of computervision is bright and it’s only the beginning. Cheers to the future 🍻.