Last week I was running some computer vision inference benchmarks when I heard my machine’s fans instantly fire up.
It sounded like a rocket ship taking off, and it prompted me to take a peek at htop and view some details on my machine’s processes.

Huh, that’s strange. Out of my 20 CPU cores, 14 of them were pegged at ~100% utilization, and when I killed my benchmark, they all shot back to ~0%. This was strange to me because this particular machine has an NVIDIA RTX 3070 Ti, and I thought the machine was configured to use it. Let’s take a closer look at nvidia-smi and nvcc. These commands display the Nvidia CUDA compiler version and also display information about the GPU devices on your system like drivers, utilization, memory, etc.
nvcc --version
Command 'nvcc' not found

nvidia-smi
Command 'nvidia-smi' not found
RIP 💀. I knew this day would come. It’s time to embark on a journey of installing and configuring CUDA.

Installing NVIDIA CUDA
To get started, let’s head to the Linux Installation Guide. This is a pretty beefy document, but it has most of the information we’ll need to install and validate our work.
System Requirements
First, let’s verify we have a CUDA-Capable GPU:
lspci | grep -i nvidia
01:00.0 VGA compatible controller: NVIDIA Corporation Device 24e0 (rev a1)
01:00.1 Audio device: NVIDIA Corporation GA104 High Definition Audio Controller (rev a1)
Luckily, we see our device, and RTX 3000 series are a supported device 🙏.
Next, let’s verify we have a supported version of Linux:
uname -m && cat /etc/*release

x86_64
DISTRIB_ID=Ubuntu
DISTRIB_RELEASE=22.04
DISTRIB_CODENAME=jammy
DISTRIB_DESCRIPTION="Ubuntu 22.04.5 LTS"
PRETTY_NAME="Ubuntu 22.04.5 LTS"
NAME="Ubuntu"
VERSION_ID="22.04"
VERSION="22.04.5 LTS (Jammy Jellyfish)"
VERSION_CODENAME=jammy
ID=ubuntu
ID_LIKE=debian
HOME_URL="https://www.ubuntu.com/"
SUPPORT_URL="https://help.ubuntu.com/"
BUG_REPORT_URL="https://bugs.launchpad.net/ubuntu/"
PRIVACY_POLICY_URL="https://www.ubuntu.com/legal/terms-and-policies/privacy-policy"
UBUNTU_CODENAME=jammy
Okay, we’re running 22.04 Linux on a 64-bit system (X86_64), which is also supported.
Lastly, we’ll need to verify we have GNU Compiler Collection (gcc) installed:
gcc --version
gcc (Ubuntu 11.4.0-1ubuntu1~22.04) 11.4.0
Copyright (C) 2021 Free Software Foundation, Inc.
This is free software; see the source for copying conditions.  There is NO
warranty; not even for MERCHANTABILITY or FITNESS FOR A PARTICULAR PURPOSE.
It looks like we’re ready to rock ’n roll.
The Install Process
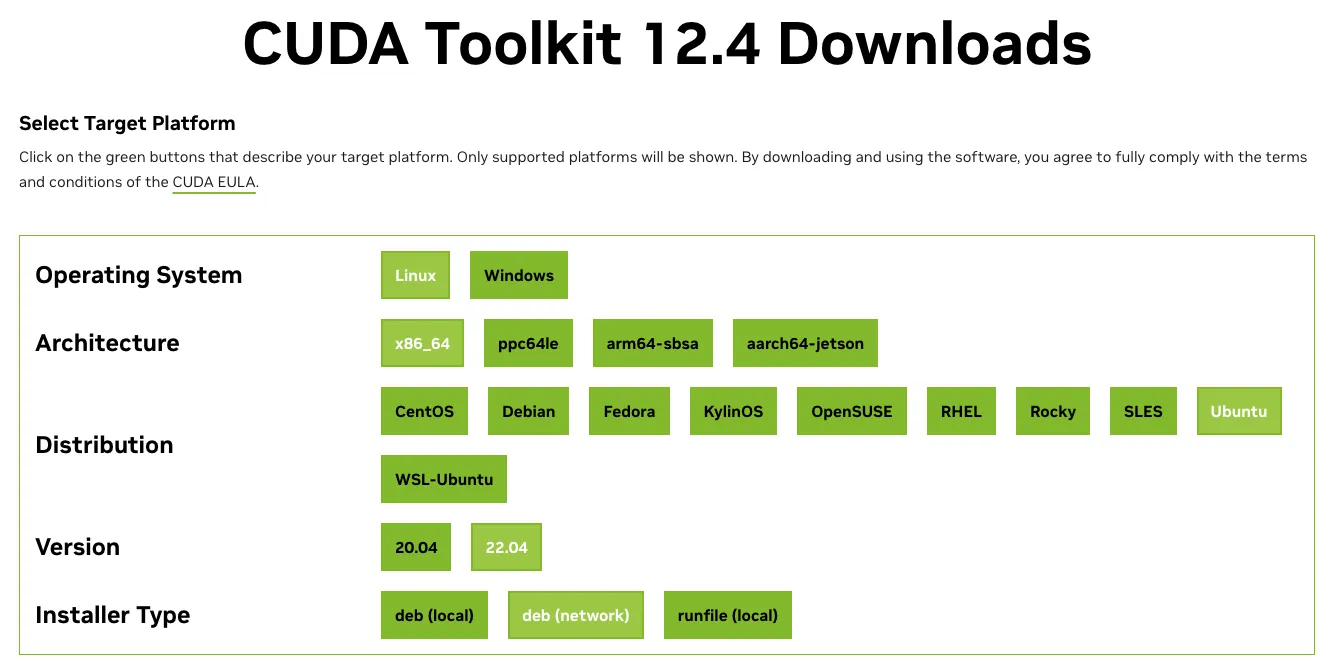
Next up is to decide which version of CUDA Toolkit we’ll install. I’m installing CUDA 12.4 release, but on each version, it has you select the following:
- Operating System
- Architecture
- Distribution
- Version
- Installer Type
The web page then provides you with either a package manager install or a runfile. I went ahead with the package manager to install the drivers and the toolkit.

The installer first had me complete the toolkit install:
wget https://developer.download.nvidia.com/compute/cuda/repos/ubuntu2204/x86_64/cuda-keyring_1.1-1_all.deb
sudo dpkg -i cuda-keyring_1.1-1_all.deb
sudo apt-get update
sudo apt-get -y install cuda-toolkit-12-4
Then it had me install the drivers:
sudo apt-get install -y nvidia-driver-550-open
sudo apt-get install -y cuda-drivers-550
Interestingly, the nvidia-driver-550-open package installed fine, but I had an unmet dependencies error installing cuda-drivers-550.
At this point, I booted my machine to see if the nvidia-driver-550-open would show in nvidia-smi.
nvidia-smi

Sun Nov 24 13:35:06 2024
+-----------------------------------------------------------------------------------------+
| NVIDIA-SMI 550.127.05             Driver Version: 550.127.05     CUDA Version: 12.4     |
|-----------------------------------------+------------------------+----------------------+
| GPU  Name                 Persistence-M | Bus-Id          Disp.A | Volatile Uncorr. ECC |
| Fan  Temp   Perf          Pwr:Usage/Cap |           Memory-Usage | GPU-Util  Compute M. |
|                                         |                        |               MIG M. |
|=========================================+========================+======================|
|   0  NVIDIA GeForce RTX 3070 ...    Off |   00000000:01:00.0 Off |                  N/A |
| N/A   44C    P8             12W /   80W |      98MiB /   8192MiB |      0%      Default |
|                                         |                        |                  N/A |
+-----------------------------------------+------------------------+----------------------+

+-----------------------------------------------------------------------------------------+
| Processes:                                                                              |
|  GPU   GI   CI        PID   Type   Process name                              GPU Memory |
|        ID   ID                                                               Usage      |
|=========================================================================================|
|    0   N/A  N/A     11239      G   /usr/lib/xorg/Xorg                              4MiB |
+-----------------------------------------------------------------------------------------+
🤩
Post Install Steps
The last step in the setup process is to make sure the CUDA toolkit is on our path.
You can take a peek at the CUDA toolkit files under /usr/local/cuda-{version}.
On Linux, we can do this by adding the following line to our ~/.bashrc file.
Remember to source the file for the changes to take effect.
echo 'export PATH=/usr/local/cuda-12.4/bin${PATH:+:${PATH}}' >> ~/.bashrc && source ~/.bashrc
Now we can see the runtime version by running nvcc --version.
nvcc --version

nvcc: NVIDIA (R) Cuda compiler driver
Copyright (c) 2005-2024 NVIDIA Corporation
Built on Thu_Mar_28_02:18:24_PDT_2024
Cuda compilation tools, release 12.4, V12.4.131
Build cuda_12.4.r12.4/compiler.34097967_0
One interesting learning here is that the CUDA drivers are backwards compatible. What this means is that we could also install older versions of the CUDA Toolkit as well, like 12.2, 11.8, etc.
Verify Installation
The easiest way, in my opinion, to verify the installation is by using the Cuda Samples GitHub repo. Here, there are a variety of programs you can compile to test your GPU.
Let’s build and run the bandwidth test.
To build the program, cd into /home/nickherrig/cuda-samples/Samples/1_Utilities/bandwidthTest and run make.
From there, you can run the test.
./bandwidthTest
[CUDA Bandwidth Test] - Starting...
Running on...

 Device 0: NVIDIA GeForce RTX 3070 Ti Laptop GPU
 Quick Mode

 Host to Device Bandwidth, 1 Device(s)
 PINNED Memory Transfers
   Transfer Size (Bytes)	Bandwidth(GB/s)
   32000000			11.4

 Device to Host Bandwidth, 1 Device(s)
 PINNED Memory Transfers
   Transfer Size (Bytes)	Bandwidth(GB/s)
   32000000			10.4

 Device to Device Bandwidth, 1 Device(s)
 PINNED Memory Transfers
   Transfer Size (Bytes)	Bandwidth(GB/s)
   32000000			346.6

Result = PASS

NOTE: The CUDA Samples are not meant for performance measurements. Results may vary when GPU Boost is enabled.
What’s Next?
This work was a side quest in preparing my next blog covering Roboflow Inference benchmarking. Looking forward to testing the speed differences on GPUs and CPUs running our Python package and inference servers.
Stay tuned! 🥂